Luscious Butterfinger Pie
One of the best parts of having a sweet tooth is stumbling upon desserts that look indulgent but come together with surprising ease. That was exactly the case the day I decided to experiment with a no bake pie using a bag of Butterfinger bars I had tucked away. The crunch of the candy, the smoothness of cream cheese, and the creaminess of Cool Whip sounded like they might create a winning combination.
Each piece broke into golden shards, and I could already imagine how they would add both crunch and flavor. Mixing the cream cheese with peanut butter turned the base into a silky, nutty cloud, and when I folded in the candy, the texture instantly became more playful.
As the pie chilled in the refrigerator, I couldn’t help but peek at it every so often. The anticipation of cutting into that Oreo crust and seeing the layers inside was hard to resist. Hours later, when the first slice finally came out, the combination of velvety filling and candy crunch felt like pure joy on a fork.
Short Description
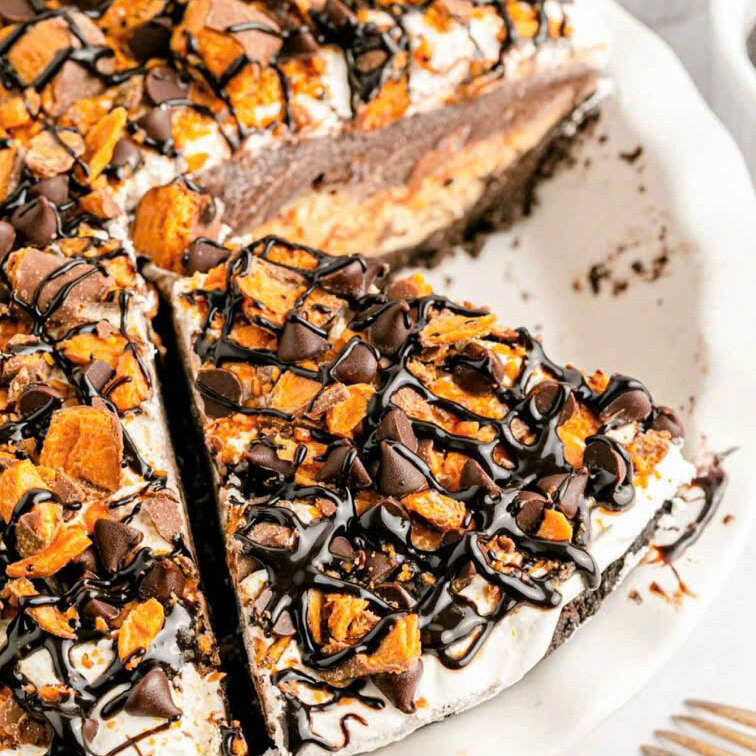
A creamy no bake pie filled with peanut butter, cream cheese, Cool Whip, and crushed Butterfingers, set in a chocolate crust for a luscious, crowd pleasing dessert.
Key Ingredients
- 1 (8 ounce) package cream cheese, room temperature
- ½ cup creamy peanut butter
- 2 teaspoons vanilla extract
- 1 ½ cups powdered sugar
- 1 (12.5 ounce) bag fun sized Butterfinger bars, crushed (reserve 2 bars to sprinkle on top)
- 1 (8 ounce) container Cool Whip, thawed
- 1 store bought Oreo or chocolate graham cracker crust
Tools Needed
- Large mixing bowl
- Electric hand mixer or stand mixer
- Rubber spatula
- Measuring cups and spoons
- Plastic bag and rolling pin (for crushing candy bars)
- Pie server
Cooking Instructions
Step 1: Mix the Base
Place cream cheese and peanut butter in a large mixing bowl. Add vanilla extract and beat with an electric mixer until smooth and creamy, with no visible lumps.
Step 2: Sweeten the Filling
Gradually add the powdered sugar and continue beating until the mixture is fully combined and fluffy. If the mixture looks too stiff, scrape the sides of the bowl and beat again to ensure even blending.
Step 3: Fold in Candy Crunch
Add the crushed Butterfingers (except the reserved portion) and gently fold them in using a rubber spatula. This keeps the candy pieces from breaking down too much while still spreading evenly through the filling.
Step 4: Add the Creamy Lift
Fold in the Cool Whip until the filling is light and airy. Be gentle to maintain the fluffiness the mixture should look smooth with specks of Butterfinger throughout.
Step 5: Fill and Finish
Spread the filling evenly into the Oreo or chocolate graham cracker crust. Smooth the top, then sprinkle the reserved crushed Butterfingers over the surface.
Step 6: Chill to Set
Cover loosely with plastic wrap and refrigerate for at least 4 hours before serving. This allows the filling to firm up and the flavors to meld together. The pie should slice cleanly when properly chilled.
Why You’ll Love This Recipe
Creamy and crunchy in every bite
No baking required
Uses simple pantry friendly ingredients
Crowd pleasing dessert for parties, holidays, or weeknights
Easy to prepare ahead of time
Mistakes to Avoid & Solutions
Mistake 1: Using cold cream cheese
Solution: Always bring cream cheese to room temperature before mixing. Cold cream cheese will create lumps and a grainy texture.
Mistake 2: Overmixing Cool Whip
Solution: Fold gently with a spatula to maintain a light, airy texture. Overmixing will deflate the filling.
Mistake 3: Not crushing candy bars properly
Solution: Place the bars in a plastic bag and use a rolling pin. Aim for small chunks rather than fine dust to add crunch.
Mistake 4: Cutting too early
Solution: Chill for the full 4 hours. Cutting too soon results in a runny filling that won’t hold shape.
Mistake 5: Storing uncovered in the fridge
Solution: Always cover with plastic wrap or store in an airtight container to prevent the pie from absorbing fridge odors.
Serving and Pairing Suggestions
Serve chilled with a drizzle of chocolate syrup for extra richness
Pair with hot coffee or cold milk for a nostalgic treat
Offer as part of a dessert buffet for parties
Garnish each slice with whipped cream or mini Butterfinger pieces for presentation
Storage and Reheating Tips
Store in the refrigerator, covered, for up to 4 days
Freeze slices individually wrapped in plastic wrap and placed in an airtight container for up to 1 month
Thaw frozen slices overnight in the fridge before serving
Do not reheat this pie is meant to be enjoyed chilled
FAQs
1. Can I use homemade whipped cream instead of Cool Whip?
Yes, you can substitute with 3 cups of stabilized whipped cream. It will be slightly less sweet but equally fluffy.
2. Can I make this pie in advance?
Absolutely! It’s best made a day ahead since chilling helps the flavors meld.
3. Can I use a homemade crust?
Yes, a homemade Oreo or graham cracker crust works well. Just bake the crust for 10 minutes at 350°F, cool completely, then fill.
4. Can I substitute the Butterfingers with another candy?
Reese’s, Snickers, or Crunch bars also work, each giving a unique flavor twist.
5. Why does my pie filling look runny?
It’s likely under chilled. Give it more time in the refrigerator, or ensure you didn’t overmix the Cool Whip.
Tips & Tricks
Crush candy bars into different sizes for a mix of crunchy and melt in your mouth bites.
For a decorative finish, drizzle melted chocolate or peanut butter on top before chilling.
If you prefer less sweetness, reduce powdered sugar to 1 cup.
Use a serrated knife dipped in hot water to slice cleanly through the pie.
Recipe Variations
Chocolate Lover’s Version: Replace ½ cup peanut butter with Nutella and top with chocolate shavings.
Frozen Butterfinger Pie: Freeze the filled pie overnight and serve as a frozen dessert, letting it thaw 10 minutes before slicing.
Mini Pies: Divide the filling among mini graham cracker crusts for individual servings, perfect for parties.
Salted Caramel Twist: Drizzle caramel sauce over the filling before adding the top layer of candy for a sweet salty balance.
Healthier Swap: Use reduced fat cream cheese, natural peanut butter, and light whipped topping to cut down on calories without losing flavor.
Final Thoughts
Luscious Butterfinger Pie proves that great desserts don’t need to be complicated. The creamy peanut butter and cream cheese filling, paired with the crunchy sweetness of Butterfingers, delivers a flavor that feels both nostalgic and fresh.
This pie is perfect when you want a dessert that makes people smile with the first bite. It looks impressive on the table, yet the preparation is straightforward enough for even a beginner baker. Every slice offers that satisfying contrast of smooth filling and candy crunch.
Luscious Butterfinger Pie
Course: DessertDifficulty: Easy4
servings20
minutes20
minutes4
hoursA creamy no bake pie filled with peanut butter, cream cheese, Cool Whip, and crushed Butterfingers, set in a chocolate crust for a luscious, crowd pleasing dessert.
Ingredients
1 (8 ounce) package cream cheese, room temperature
½ cup creamy peanut butter
2 teaspoons vanilla extract
1 ½ cups powdered sugar
1 (12.5 ounce) bag fun sized Butterfinger bars, crushed (reserve 2 bars to sprinkle on top)
1 (8 ounce) container Cool Whip, thawed
1 store bought Oreo or chocolate graham cracker crust
Directions
- Beat cream cheese, peanut butter, and vanilla until smooth.
- Add powdered sugar and mix until fluffy.
- Fold in crushed Butterfingers (reserve some for topping).
- Gently fold in Cool Whip until creamy.
- Spread mixture into pie crust and smooth the top.
- Sprinkle reserved Butterfingers on top.
- Chill in refrigerator for at least 4 hours before serving.