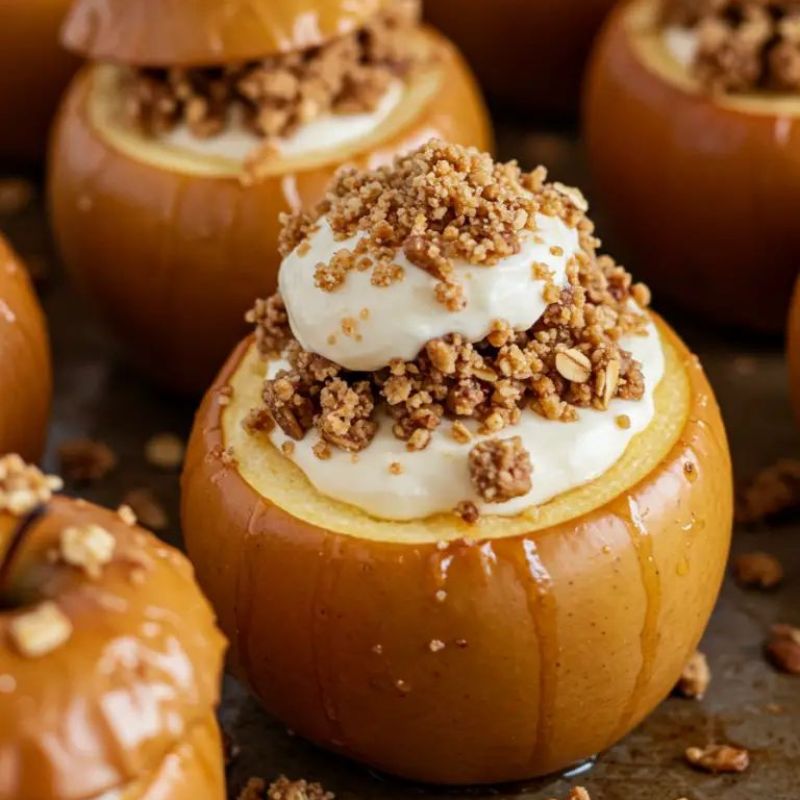
Decadent Cheesecake Stuffed Apples
One crisp autumn afternoon, my friend Mia arrived at my door with a basket full of freshly picked Honeycrisp apples from her family’s orchard. The air outside carried that familiar mix of cinnamon, wood smoke, and chilly breeze the kind that quietly announces fall’s arrival.
Over coffee, we started dreaming up dessert ideas, and she mentioned her grandmother’s baked apples filled with cheesecake. That single thought lingered with me long after she left.
Later that evening, I set out to recreate it. The apples glistened under the kitchen light, and as the oven warmed the room, a sweet aroma of vanilla and brown sugar began to swirl through the air. When they finally emerged, their tops golden and slightly caramelized, I knew this recipe would become part of my fall ritual.
Every spoonful carried a little contrast, the tart bite of apple meeting the silky cheesecake center, and the soft spice of cinnamon balancing the drizzle of caramel. It was simple, nostalgic, and full of character the kind of dessert that makes a house feel like a home again.
Short Description
These Decadent Cheesecake Stuffed Apples bring together the warmth of baked apples, creamy cheesecake filling, and a caramel drizzle for a dessert that’s both elegant and comforting.
Key Ingredients
- 4 medium-sized apples (Granny Smith or Honeycrisp)
- 8 oz cream cheese, softened
- ½ cup granulated sugar
- ¼ cup brown sugar
- 1 tsp vanilla extract
- ½ tsp ground cinnamon
- ¼ tsp salt
- ½ cup sour cream
- ½ cup crushed graham crackers
- ¼ cup chopped nuts (optional, walnuts or pecans)
- ¼ cup caramel sauce (for drizzling)
- 1 tbsp lemon juice (to prevent browning of apples)
Tools Needed
- Paring knife or apple corer
- Mixing bowls
- Hand or stand mixer
- Baking dish
- Aluminum foil
- Measuring cups and spoons
Cooking Instructions
Step 1: Preheat the oven
Preheat your oven to 350°F (175°C).
Step 2: Prepare the apples
Wash the apples thoroughly under cold water and pat them dry.
Step 3: Core the apples
Carefully remove the core from each apple, leaving the bottom intact to create a cavity.
Step 4: Add lemon juice
Drizzle a little lemon juice inside each apple to prevent browning.
Step 5: Make the cheesecake filling
In a large mixing bowl, combine the softened cream cheese and granulated sugar. Beat on medium speed until smooth and creamy (about 2–3 minutes).
Step 6: Add flavorings
Add the brown sugar, vanilla extract, ground cinnamon, and salt. Mix until well incorporated.
Step 7: Add sour cream
Add the sour cream and mix until fully combined.
Step 8: Fold in extras
Fold in the crushed graham crackers and chopped nuts (if using) with a spatula.
Step 9: Fill the apples
Fill each apple with the cheesecake mixture using a spoon or piping bag, packing it gently but firmly.
Step 10: Prepare for baking
Place the filled apples upright in a baking dish. Spoon any leftover filling around the apples.
Step 11: Cover
Cover the baking dish with aluminum foil.
Step 12: Bake until tender
Bake in the preheated oven for 25–30 minutes until the apples are tender but not mushy.
Step 13: Brown the tops
Remove the foil and bake for an additional 10–15 minutes to brown the tops slightly.
Step 14: Cool
Let the apples cool for about 10 minutes before serving.
Step 15: Add finishing touches
Drizzle with caramel sauce and sprinkle with extra cinnamon if desired.
Step 16: Serve
Serve warm with a scoop of vanilla ice cream or a dollop of whipped cream for a delightful contrast.
Step 17: Store leftovers
Allow any leftovers to cool completely before storing in an airtight container in the refrigerator.
Why You’ll Love This Recipe
A balance of creamy, fruity, and lightly spiced flavors.
Uses simple, accessible ingredients.
Perfect for gatherings or quiet evenings at home.
Family-friendly and easy to customize.
Fills your kitchen with a sweet autumn aroma.
Mistakes to Avoid & Solutions
Overbaking the apples: Stop baking once they’re soft but still hold their shape.
Using overly tart apples: Choose Honeycrisp or Fuji for a pleasant balance.
Skipping the lemon juice: Prevents oxidation and browning.
Filling too far ahead: The apples will release moisture fill just before baking.
Leaving uncovered: Always cover for the first bake to avoid burning.
Serving and Pairing Suggestions
Serve warm, topped with vanilla ice cream or whipped cream.
Pair with chai tea, hot apple cider, or a drizzle of espresso caramel for an adult twist.
Present individually on dessert plates for an elegant look.
Or, serve family-style in a rustic baking dish for cozy gatherings.
Garnish with extra cinnamon or crushed nuts before serving for added texture.
Storage and Reheating Tips
Store leftovers in an airtight container in the refrigerator for up to 3 days.
Reheat in the oven at 325°F (160°C) for about 10 minutes to bring back texture and warmth.
Avoid microwaving it; it may make the apples too soft.
For best results, add a fresh drizzle of caramel sauce after reheating.
FAQs
1. Can I prepare them ahead of time?
Yes, just prep the apples and filling separately, then assemble right before baking.
2. Which apples are best for this recipe?
Granny Smith and Honeycrisp are ideal for holding shape while baking.
3. Can I make them lighter?
Use low-fat cream cheese or Greek yogurt instead of sour cream.
4. What if I don’t have graham crackers?
Crushed digestive biscuits or vanilla wafers work well.
5. How can I make this gluten-free?
Use gluten-free crackers and a certified caramel sauce.
Tips & Tricks
Chill the filling briefly before stuffing for easier handling.
Add a touch of nutmeg or cardamom for deeper flavor.
Top with toasted coconut or crushed granola for crunch.
For an elegant dessert, halve the apples and plate individually.
Recipe Variations
Caramel Pecan Cheesecake Apples: Replace nuts with toasted pecans and drizzle extra caramel.
Maple Cinnamon Cheesecake Apples: Stir in 1 tbsp maple syrup for natural sweetness.
Chocolate Drizzle Version: Swap caramel for melted dark chocolate and sprinkle sea salt on top.
Final Thoughts
Baked apples have a quiet way of transforming an ordinary evening into something special. Their scent lingers long after the oven cools, bringing warmth to both the kitchen and the heart.
Each bite of cheesecake and apple together speaks of comfort, familiarity, and care, proving that simple ingredients can create something deeply satisfying. Share it around the table or savor it in silence; either way, Decadent Cheesecake Stuffed Apples capture everything lovely about the season.
Decadent Cheesecake Stuffed Apples
Course: DessertDifficulty: Easy4
servings20
minutes45
minutesThese Decadent Cheesecake Stuffed Apples bring together the warmth of baked apples, creamy cheesecake filling, and a caramel drizzle for a dessert that’s both elegant and comforting.
Ingredients
4 medium-sized apples (Granny Smith or Honeycrisp)
8 oz cream cheese, softened
½ cup granulated sugar
¼ cup brown sugar
1 tsp vanilla extract
½ tsp ground cinnamon
¼ tsp salt
½ cup sour cream
½ cup crushed graham crackers
¼ cup chopped nuts (optional, walnuts or pecans)
¼ cup caramel sauce (for drizzling)
1 tbsp lemon juice (to prevent browning of apples)
Directions
- Preheat the oven to 350°F (175°C).
- Wash the apples under cold water and pat them dry.
- Carefully core each apple, keeping the bottom intact.
- Drizzle a little lemon juice inside to prevent browning.
- In a bowl, beat cream cheese and granulated sugar until smooth (2–3 minutes).
- Add brown sugar, vanilla, cinnamon, and salt; mix well.
- Add sour cream and blend until creamy.
- Fold in crushed graham crackers and chopped nuts (if using).
- Fill apples with the cheesecake mixture, packing gently but firmly.
- Place filled apples upright in a baking dish; spoon any leftover filling around them.
- Cover the dish with aluminum foil.
- Bake for 25–30 minutes until apples are tender but not mushy.
- Remove foil and bake another 10–15 minutes to brown the tops.
- Let cool for 10 minutes before serving.
- Drizzle with caramel sauce and sprinkle extra cinnamon if desired.
- Serve warm with vanilla ice cream or whipped cream.
- Cool leftovers completely, then store in an airtight container in the fridge.