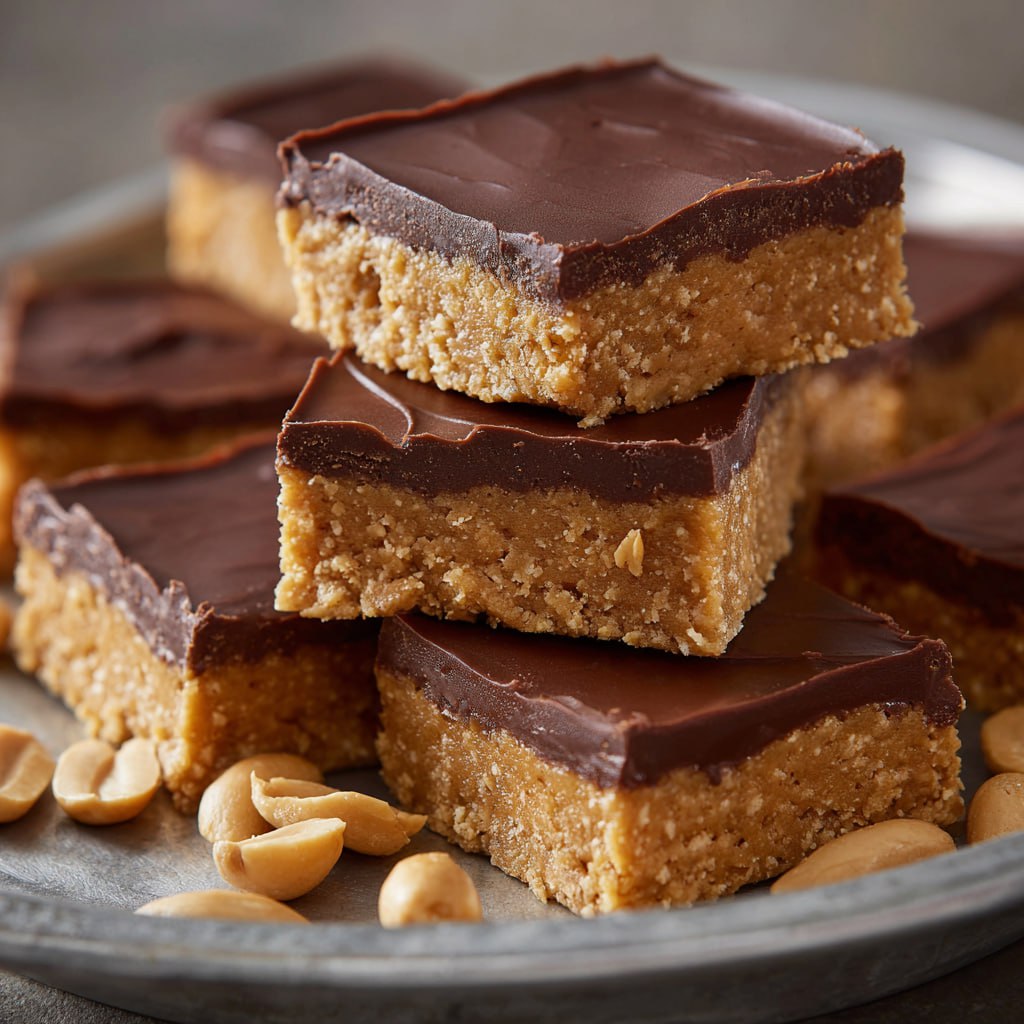
Nutty Protein Bars
Some mornings just call for something quick yet nourishing a snack that gives you energy without feeling heavy. That’s Nutty Protein Bars came about in my kitchen one weekend. I wanted something that could double as a pre workout boost and a mid afternoon pick me up.
The pantry was my playground that day: a jar of creamy peanut butter, a scoop of protein powder, and a bottle of pure maple syrup waited on the counter. Mixing everything by hand, I was struck by how satisfying it felt to bring together a dough so rich yet wholesome.
The peanut aroma instantly filled the air as I stirred, and before long, smooth bars setting in the fridge, glistening slightly under a thin coat of melted chocolate. I slicing the first chilled piece it held its shape beautifully, dense but soft, like the perfect balance between a dessert and a fuel packed snack.
You could add your favorite flavors chocolate chips, coconut flakes, or even espresso powder and each small tweak makes the bars uniquely yours. These Nutty Protein Bars became a new favorite for quick breakfasts, gym snacks, and moments when I just need a bite of something energizing yet indulgent.
Short Description
Nutty Protein Bars made with peanut butter, protein powder, and maple syrup for a chewy, energizing snack that’s packed with flavor and nutrients.
Key Ingredients
- 1½ cups peanut butter (or allergy friendly substitute)
- ¾ cup protein powder (90 g)
- ¼ cup pure maple syrup or honey
- ½ teaspoon salt
- 4 oz melted chocolate chips (optional for coating)
Tools Needed
- Mixing bowl
- Spatula or wooden spoon
- Measuring cups and spoons
- 8×8 inch baking pan
- Parchment paper
- Knife for cutting bars
Cooking Instructions
Step 1: Prepare the Base
In a large mixing bowl, stir together peanut butter, protein powder, maple syrup (or honey), and salt. Mix until a thick dough forms. The dough should be firm but pliable.
Step 2: Adjust the Texture if Needed
If the mixture feels too dry, add 1 tablespoon of maple syrup or water at a time until it comes together smoothly. If it’s too sticky, sprinkle in more protein powder.
Step 3: Shape the Bars
Press the dough evenly into a parchment lined 8×8 inch pan. Smooth the top with the back of a spoon or spatula. Alternatively, shape into individual bars by hand.
Step 4: Optional Chocolate Coating
For a richer version, melt the chocolate chips (mixing in 2 teaspoons of oil if you prefer a glossy finish). Spread the chocolate over the top of the dough or dip each bar individually.
Step 5: Chill and Slice
Refrigerate the pan for at least 1 hour or until firm. Once set, remove from the pan and slice into even bars. Store in an airtight container.
Why You’ll Love This Recipe
No baking required ready in minutes
High in protein and healthy fats for sustained energy
Naturally sweetened with maple syrup or honey
Customizable with endless flavor add ins
Perfect for meal prep or grab and go snacking
Mistakes to Avoid & Solutions
Mistake 1: Using protein powder with a flavor you dislike
Solution: Choose a protein powder you enjoy since its taste dominates the recipe. Unsweetened or vanilla flavors work best.
Mistake 2: Mixture too dry or crumbly
Solution: Add a splash of milk or extra maple syrup to help it bind. Adjust slowly to avoid making it too soft.
Mistake 3: Bars sticking to the pan
Solution: Always line your pan with parchment paper for easy removal.
Mistake 4: Chocolate layer cracking when sliced
Solution: Let the chocolate sit at room temperature for 5–10 minutes after chilling before cutting.
Mistake 5: Bars becoming too soft at room temperature
Solution: Keep them refrigerated for best texture and firmness, especially in warm climates.
Serving and Pairing Suggestions
Pair with black coffee or a matcha latte for a balanced morning snack
Serve as a pre or post workout bite for quick fuel
Add to a lunchbox for a healthy dessert alternative
Slice into smaller cubes for buffet or party platters
Drizzle with melted white chocolate for an elegant presentation
Storage and Reheating Tips
Storage: Keep bars in an airtight container in the fridge for up to 1 week.
Freezing: Freeze for up to 2 months; thaw at room temperature for 15–20 minutes before eating.
Reheating: No reheating needed these are best enjoyed chilled or at room temperature.
On the Go Tip: Wrap each bar individually in parchment or wax paper for easy portability.
FAQs
1. Can I use almond or cashew butter instead of peanut butter?
Yes! Any nut or seed butter works well. Almond butter creates a milder flavor, while sunflower seed butter keeps it nut free.
2. What kind of protein powder works best?
Unsweetened or vanilla whey, plant based, or soy protein powders all perform well just ensure you enjoy the flavor.
3. How can I make these bars lower in sugar?
Use sugar free maple syrup or stevia-based syrup. You can also skip the chocolate topping.
4. Do I have to refrigerate the bars?
Yes, refrigeration helps them stay firm and fresh, especially with natural nut butters.
5. Can I add mix ins like nuts or dried fruit?
Definitely! Stir in chopped almonds, coconut flakes, or mini chocolate chips before pressing into the pan.
Tips & Tricks
Use natural peanut butter with minimal ingredients for the best texture.
To make slicing cleaner, warm your knife under hot water and wipe between cuts.
Add 1 teaspoon of vanilla extract for enhanced flavor depth.
Mix dough by hand it helps you feel the texture and control consistency.
For extra crunch, top with crushed nuts before chilling.
Recipe Variations
Chocolate Coconut Protein Bars:
Add ¼ cup shredded coconut and 1 tablespoon cocoa powder to the dough. Coat with dark chocolate and chill. The flavor becomes rich, nutty, and slightly tropical.
Peanut Butter Banana Bars:
Mix in 2 tablespoons of mashed ripe banana. Add extra 2 tablespoons protein powder to balance the moisture. These bars taste naturally sweet and soft.
Mocha Espresso Bars:
Stir in 1 teaspoon instant espresso powder and 1 tablespoon cocoa. Dip in dark chocolate for a bold, energizing flavor.
Keto Protein Bars:
Replace maple syrup with sugar free syrup and choose a low carb protein powder. Add chopped pecans or almonds for texture.
Final Thoughts
Nutty Protein Bars prove that nutritious snacks can be both satisfying and simple. They’re rich, chewy, and perfectly balanced between sweetness and nuttiness. Each bar feels like a small energy boost packed with natural goodness something you can actually look forward to eating.
I often make a batch on Sunday nights, wrap them neatly, and keep them in the fridge for quick access during the week. The process takes minimal effort yet rewards you with something that feels homemade and wholesome satisfaction in creating a snack that supports your goals while indulging your taste buds.
Nutty Protein Bars
Course: DessertsDifficulty: Easy10
servings10
minutes5
minutes1
hoursNutty Protein Bars made with peanut butter, protein powder, and maple syrup for a chewy, energizing snack that’s packed with flavor and nutrients.
Ingredients
1½ cups peanut butter (or allergy friendly substitute)
¾ cup protein powder (90 g)
¼ cup pure maple syrup or honey
½ teaspoon salt
4 oz melted chocolate chips (optional for coating)
Directions
- Combine peanut butter, protein powder, maple syrup (or honey), and salt in a bowl until a thick dough forms.
- If too dry, add a bit more syrup or water; if too sticky, add more protein powder.
- Press the dough into a parchment-lined 8×8-inch pan or shape by hand.
- Spread melted chocolate on top or dip each bar for coating.
- Refrigerate for 1 hour, then cut into bars and store in the fridge.