No-Bake Grinch Christmas Cheesecake
The weeknight before guests arrive is always a little chaotic in my kitchen. On this particular pre-holiday baking weekend, my best friend was perched on a stool in my apartment, scrolling through gift ideas while I tried to clear counter space. The city outside felt quieter than usual, like it knew December was rushing in. I wanted something festive, bold, and unmistakably playful. Not fussy. Not baked.
That was when I spotted neon green food coloring buried in the back of my drawer, left over from a styling project that never happened. Suddenly, the Grinch popped into my head. Mischievous, dramatic, unapologetically green.
I started crushing Oreos while my friend laughed, already predicting this would turn into “one of those desserts people photograph before eating.” The cream cheese softened fast near the stove’s warmth, the mixer hummed, and the kitchen filled with that familiar tangy sweetness.
When I spread the bright green filling over the dark Oreo crust, it felt almost rebellious. Too green. Too fun. Exactly right. By the time the cheesecake went into the fridge, my friend was already calling dibs on the corner slice. That was the moment I knew this dessert wasn’t just cute. It was a crowd-pleaser waiting to happen.
Short Description
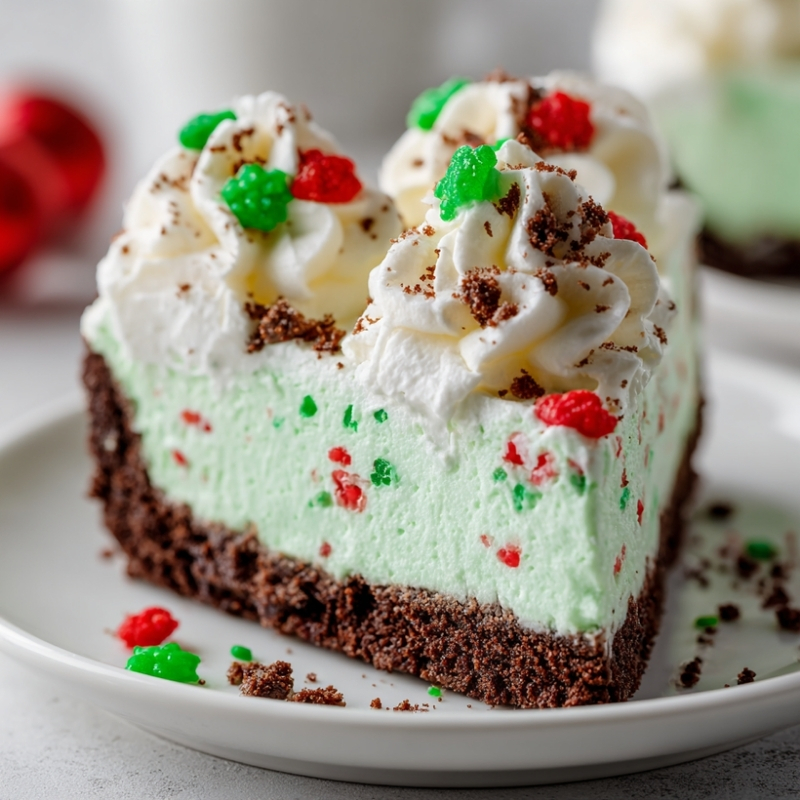
This No-Bake Grinch Christmas Cheesecake features a rich Oreo crust, a fluffy neon green cream cheese filling, and sweet red heart sprinkles for a festive finish. It’s creamy, playful, and perfect for holiday gatherings without turning on the oven.
Key Ingredients
- 72 Oreo cookies, finely crushed
- 1 cup unsalted butter, melted
- 4 packages cream cheese, 8 oz each, softened
- 4 cups powdered sugar
- 32 oz Cool Whip or homemade whipped cream
- Neon green food coloring, adjusted as needed
- ½ teaspoon mint extract, optional
- Red heart sprinkles or red candies for garnish
Tools Needed
- Food processor or blender for crushing cookies
- Large mixing bowl
- Electric hand mixer or stand mixer
- Rubber spatula
- 9×13-inch pan or two 9-inch pie pans
- Measuring cups and spoons
Cooking Instructions
Step 1: Prepare the Crust
Add the finely crushed Oreo cookies to a mixing bowl. Pour in the melted butter and stir until the mixture looks evenly coated and slightly glossy. Press the mixture firmly into the bottom of a 9×13-inch pan, using the back of a measuring cup to create a compact, even layer. The crust should feel packed and solid, not crumbly. Place the pan in the refrigerator to chill for at least 15 minutes while you prepare the filling.
Step 2: Mix the Cream Cheese Base
In a large bowl, beat the softened cream cheese on medium speed for 2 to 3 minutes until completely smooth. Scrape down the sides of the bowl to prevent lumps. Add the powdered sugar gradually and continue mixing until the texture turns fluffy and light. If the mixture feels thick or stiff, mix for another 30 seconds until it loosens.
Step 3: Add Whipped Cream and Color
Fold in the Cool Whip gently using a spatula. Add a few drops of neon green food coloring and the mint extract if using. Mix slowly until the color is evenly distributed. Stop frequently to check the shade. The filling should be bright green but still soft and airy. If the color looks dull, add one drop at a time.
Step 4: Assemble the Cheesecake
Spoon the green cheesecake filling over the chilled crust. Spread it evenly from edge to edge, smoothing the top with an offset spatula or the back of a spoon. The surface should look creamy and level without air pockets.
Step 5: Chill Until Set
Cover the pan loosely with plastic wrap and refrigerate for at least 4 hours. For best results, let it chill overnight. The cheesecake is ready when the center feels firm to a light touch and holds its shape when sliced.
Step 6: Decorate Before Serving
Just before serving, sprinkle red heart candies or sprinkles across the top. Press them lightly into the surface so they stay in place. The contrast should feel playful and intentional.
Why You’ll Love This Recipe
No Oven Needed: Perfect for busy days when oven space is limited.
Smooth and Creamy Texture: Light, fluffy, and rich without feeling heavy.
Festive Look: The bold green color makes it a natural holiday centerpiece.
Make-Ahead Friendly: Can be prepared a day in advance with no stress.
Customizable Flavor: Mint is optional and easy to adjust to your taste.
Mistakes to Avoid & Solutions
Lumpy Filling
This happens when cream cheese is too cold. Always soften it fully at room temperature for at least 30 minutes. If lumps appear, keep mixing on medium speed until smooth before adding whipped cream.
Crust Falling Apart
A loose crust means not enough pressure. Press the Oreo mixture firmly and evenly into the pan. Chilling the crust before adding the filling helps it hold together.
Color Too Dark or Too Pale
Food coloring develops quickly. Add it drop by drop and mix fully before deciding to add more. If it turns too dark, fold in a small amount of extra whipped cream to balance it.
Cheesecake Not Setting
This usually means it needs more chill time. Refrigerate for an extra 1 to 2 hours until firm.
Overmixing After Adding Whipped Cream
Overmixing can deflate the filling. Fold gently and stop once combined.
Serving and Pairing Suggestions
Works well on dessert tables, buffet-style holiday spreads, or plated with fresh berries on the side.
Serve chilled in clean slices using a hot, dry knife for sharp edges.
Pair with hot coffee, peppermint tea, or a light vanilla latte.
Storage and Reheating Tips
Store covered in the refrigerator for up to 4 days.
Keep decorations separate if storing slices individually to prevent color bleed.
This cheesecake is not suitable for reheating. Serve cold for best texture.
FAQs
1. Can I make this cheesecake ahead of time?
Yes, it can be made up to 24 hours in advance and stored covered in the refrigerator.
2. Can I use homemade whipped cream instead of Cool Whip?
Yes. Use about 4 cups of stabilized whipped cream whipped to stiff peaks.
3. Is the mint flavor strong?
No. At ½ teaspoon, it adds a light freshness. You can skip it entirely.
4. Can I freeze this cheesecake?
Freezing is not recommended. The texture may become grainy after thawing.
5. What pan works best for clean slices?
A 9×13-inch pan lined with parchment paper makes removal and slicing easier.
Tips & Tricks
Line the pan with parchment paper for easy lifting and clean cuts.
Use gel food coloring for brighter color with less liquid.
Chill your mixing bowl before whipping cream if making it from scratch.
Recipe Variations
Chocolate Mint Version
Add ½ cup cocoa powder to the cream cheese mixture and increase mint extract to ¾ teaspoon. Mix until smooth, then fold in whipped cream. The result is a deep green chocolate-mint cheesecake.
Lighter Sugar Version
Replace powdered sugar with 3 cups powdered monk fruit sweetener. Mix as directed. The flavor remains sweet with fewer refined sugars.
Mini Grinch Cheesecakes
Press crust into lined muffin tins, add filling, and chill for 3 hours. Decorate individually with one red heart per mini cheesecake.
Final Thoughts
By the time the cheesecake is sliced and served, the kitchen always feels calmer. The kind of calm that comes from knowing dessert is handled. This recipe leans into fun without sacrificing flavor or balance. It brings color to a table that can sometimes feel overly beige during the holidays. I love how it invites laughter before the first bite even happens.
Watching someone notice the little red hearts never gets old. This dessert carries the spirit of playful hosting, the kind where effort feels light. And when the plates come back empty, it quietly confirms you made the right call.
No-Bake Grinch Christmas Cheesecake
Course: DessertDifficulty: Easy16
servings4
hoursA creamy, no-bake Christmas cheesecake with an Oreo crust, vibrant green filling, and playful Grinch-inspired decorations. Easy to make, festive to serve, and perfect for holiday gatherings without turning on the oven.
Ingredients
72 Oreo cookies, finely crushed
1 cup unsalted butter, melted
4 packages cream cheese, 8 oz each, softened
4 cups powdered sugar
32 oz Cool Whip or homemade whipped cream
Neon green food coloring, adjusted as needed
½ teaspoon mint extract, optional
Red heart sprinkles or red candies for garnish
Directions
- Add the finely crushed Oreo cookies to a bowl, pour in the melted butter, and stir until the crumbs look evenly coated and slightly glossy.
- Press the mixture firmly into the bottom of a 9×13-inch pan, using the back of a measuring cup to compact it into an even layer. The crust should feel solid, not crumbly. Chill in the refrigerator for at least 15 minutes.
- Beat the softened cream cheese in a large bowl on medium speed for 2 to 3 minutes until smooth. Scrape down the sides, then gradually add the powdered sugar. Continue mixing until the texture turns light and fluffy. If it feels too thick, mix another 30 seconds to loosen it.
- Gently fold in the Cool Whip with a spatula. Add a few drops of neon green food coloring and the mint extract if using.
- Mix slowly until the color is evenly blended and vibrant. The filling should look bright green and airy. Add food coloring one drop at a time if needed.
- Spread the cheesecake filling evenly over the chilled crust. Smooth the top with a spoon or offset spatula until the surface looks level and creamy, with no visible air pockets.
- Cover loosely with plastic wrap and refrigerate for at least 4 hours, preferably overnight. The cheesecake is ready when the center feels firm to a light touch and slices cleanly.
- Right before serving, scatter red heart candies or sprinkles over the top and press them gently into the surface so they stay in place.