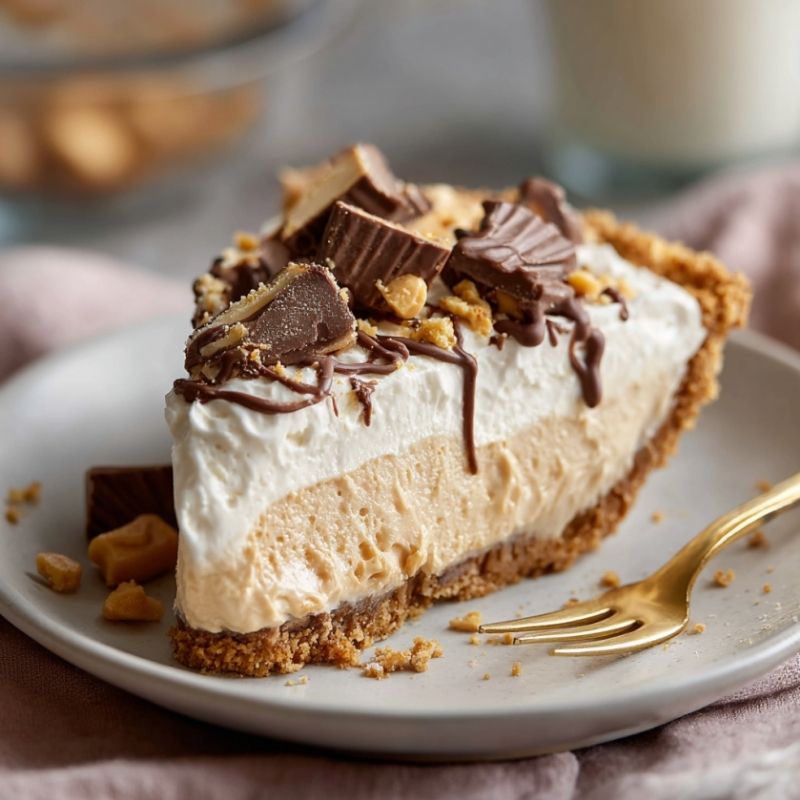
Creamy No-Bake Peanut Butter Pie
A few weeks ago, I escaped to a tiny lakeside cabin for a weekend reset—just me, my camera, a stack of cookbooks I barely opened, and a kitchen that looked straight out of a retro postcard. The place had this calm, quiet hum to it, the kind that makes you breathe a little deeper without thinking about it.
On the first night, the sun dipped behind the trees, turning the water into a sheet of rose-gold glass, and I felt that familiar itch to make something comforting but simple enough to fit the mood.
The only neighbor within shouting distance was an elderly man named Mr. Keller, who spent his evenings on the porch feeding peanuts to a family of brave little squirrels. He caught me eyeing the jar of peanut butter I brought along and said, “If you’re cooking tonight, use that. Everything tastes better with peanuts by the lake.” For reasons I still can’t explain, that was all the encouragement I needed.
So I pulled out the basic ingredients I’d packed “just in case” and started tinkering—from pressing a quick graham crust into a thrifted pie dish to whipping a cloud of cocoa-kissed cream that reminded me of sunset shadows drifting across the water. By the time the pie chilled, the cabin smelled like sweet nostalgia. Mr. Keller took a slice the next day and said it tasted like “quiet happiness,” which might be the best review I’ve ever gotten.
This no-bake peanut butter pie is the recipe I brought home from that trip—simple, creamy, and surprisingly elegant for something made in a tiny cabin kitchen.
Short Description
A creamy, no-bake peanut butter pie with a buttery graham crust, smooth peanut butter filling, and fluffy chocolate whipped cream on top. Easy, rich, and perfect for quick desserts.
Key Ingredients
- 1 ½ cups graham cracker crumbs
- ½ cup unsalted butter, melted
- 8 oz cream cheese, softened
- 1 cup creamy peanut butter
- 1 cup confectioners’ sugar
- 1 cup heavy whipping cream
- 3 tbsp cocoa powder
Tools Needed
- Mixing bowls
- Electric mixer or stand mixer
- Spatula
- Pie dish
- Whisk
- Measuring cups and spoons
Cooking Instructions
Step 1: Prepare the Crust
In a medium bowl, mix the graham cracker crumbs with the melted butter until the texture resembles damp sand. Press the mixture firmly into the bottom and up the sides of a pie dish. Use the bottom of a measuring cup to create an even, compact surface. Chill while preparing the filling so it sets and stays firm.
Step 2: Make the Filling
Blend the softened cream cheese on medium speed until completely smooth. Gradually add the peanut butter and confectioners’ sugar. Mix until the filling turns creamy and uniform. If it looks lumpy, the cream cheese may have been too cold, give it a few minutes at room temperature and mix again.
Step 3: Assemble the Pie
Spread the peanut butter filling evenly over the chilled crust, smoothing the top with a spatula.
Step 4: Whip Up the Chocolate Cream
Chill your mixing bowl for 10 minutes for best results. Beat the heavy whipping cream on medium-high speed until soft peaks form. Gradually add the cocoa powder and continue whipping until stiff peaks form. The cream should look thick, glossy, and hold its shape.
Step 5: Top the Pie
Spread or pipe the chocolate whipped cream generously over the peanut butter filling. Swirls, waves, peaks—go wild.
Step 6: Chill
Refrigerate for at least 4 hours or overnight for a firm, sliceable texture. The pie should feel softly set but stable when ready.
Why You’ll Love This Recipe
Creamy Layers: Peanut butter and cream cheese create a smooth, rich filling.
No-Bake Magic: Perfect for warm days or when you want dessert without turning on the oven.
Simple Ingredients: Pantry staples come together in minutes.
Beautiful Presentation: The chocolate whipped cream makes it look bakery-level with minimal effort.
Crowd-Pleaser: Flavors appeal to kids, adults, and anyone who loves classic peanut butter desserts.
Mistakes to Avoid & Solutions
Filling too stiff: Soften the cream cheese fully before mixing. Cold cream cheese leads to lumps.
Crust crumbling: Press firmly and use enough butter. If it still won’t hold, add 1 tbsp of melted butter at a time.
Whipped cream turning grainy: Stop mixing as soon as stiff peaks form. Overwhipping can cause curdling.
Pie not setting: Chill for the full 4 hours. If your fridge runs cold, give it extra time.
Cocoa powder clumping in the cream: Sift the cocoa powder before adding it.
Serving and Pairing Suggestions
Serve chilled for the best contrast between the creamy filling and the cool topping.
Pair with iced coffee, cold brew, or a light herbal tea.
Add chocolate curls, crushed peanuts, or shaved dark chocolate for extra flair.
Ideal for potlucks, family gatherings, and picnic desserts.
Slice cleanly using a warm knife for neat edges.
Storage and Reheating Tips
Refrigerate leftovers in an airtight container for up to 4 days.
To freeze: Wrap tightly and store for up to 2 months. Thaw in the refrigerator overnight.
Do not microwave—this pie should always be served chilled.
FAQs
1. Can I use crunchy peanut butter?
Yes, though the filling will be textured instead of silky smooth.
2. Can I swap the graham crust for Oreo crust?
Absolutely. Use crushed Oreos with melted butter and press the same way.
3. Can I make it dairy-free?
You can use dairy-free cream cheese and coconut whipped cream, though the flavor will change slightly.
4. Why is my filling too soft?
It likely needs more chilling time. Stick to the 4-hour minimum.
5. Can I make this pie ahead of time?
Yes, it’s a great make-ahead dessert. Prepare the entire pie and chill overnight.
Tips & Tricks
Use room-temperature cream cheese for the smoothest filling.
Chill the mixing bowl for the whipped cream—it improves volume and texture.
Add a pinch of sea salt to the filling to balance sweetness.
For cleaner slices, wipe the knife between each cut.
Recipe Variations
Chocolate Peanut Butter Pie: Add ½ cup cocoa powder to the filling and use an Oreo crust.
Banana Peanut Butter Pie: Layer thin banana slices over the crust before adding the filling.
Salted Caramel Peanut Butter Pie: Drizzle caramel between layers and sprinkle sea salt on top.
Mocha Cream Topping: Add 1 tsp instant espresso to the whipped cream along with cocoa powder.
Peanut Butter Cup Pie: Fold chopped peanut butter cups into the filling for a chunkier version.
Final Thoughts
Looking back on that quiet lakeside evening, this pie feels like a little souvenir from a place where the world slowed down just long enough for dessert to have its own moment. Every time I make it now, I can almost hear the distant splash of the water and see Mr. Keller’s squirrels plotting their next peanut heist.
Recipes that come from memories like that tend to stick, not because they’re complicated, but because they remind you how joy sneaks into simple things—a chilled pie, a calm evening, and a kitchen that smells like peanut butter and promise. If you ever need a dessert that feels easy but still carries a touch of magic, this one has your back in the sweetest way.
Creamy No-Bake Peanut Butter Pie
Course: DessertDifficulty: Easy8
servings20
minutes4
hoursA creamy, no-bake peanut butter pie with a buttery graham crust, smooth peanut butter filling, and fluffy chocolate whipped cream on top. Easy, rich, and perfect for quick desserts.
Ingredients
1 ½ cups graham cracker crumbs
½ cup unsalted butter, melted
8 oz cream cheese, softened
1 cup creamy peanut butter
1 cup confectioners’ sugar
1 cup heavy whipping cream
3 tbsp cocoa powder
Directions
- Mix the graham cracker crumbs and melted butter until it feels like damp sand, then press it firmly into a pie dish and chill.
- Beat the softened cream cheese until smooth, then blend in the peanut butter and confectioners’ sugar until creamy.
- Spread that filling over the crust. Whip cold heavy cream to soft peaks, add cocoa powder, and whip to stiff, glossy peaks.
- Spread or pipe the chocolate cream on top. Chill the pie for at least four hours, or overnight, until firm enough to slice.