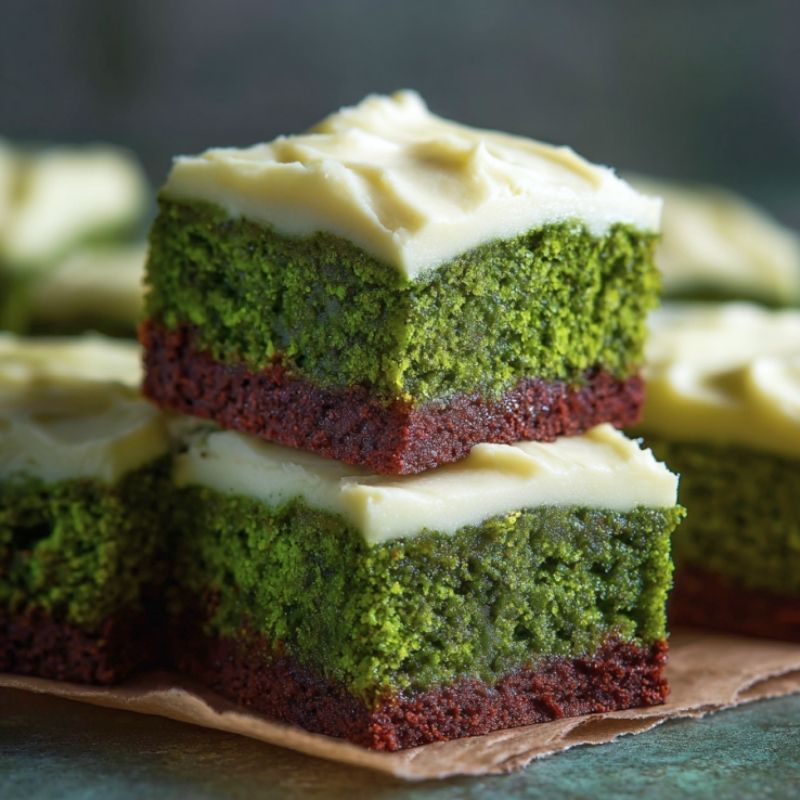
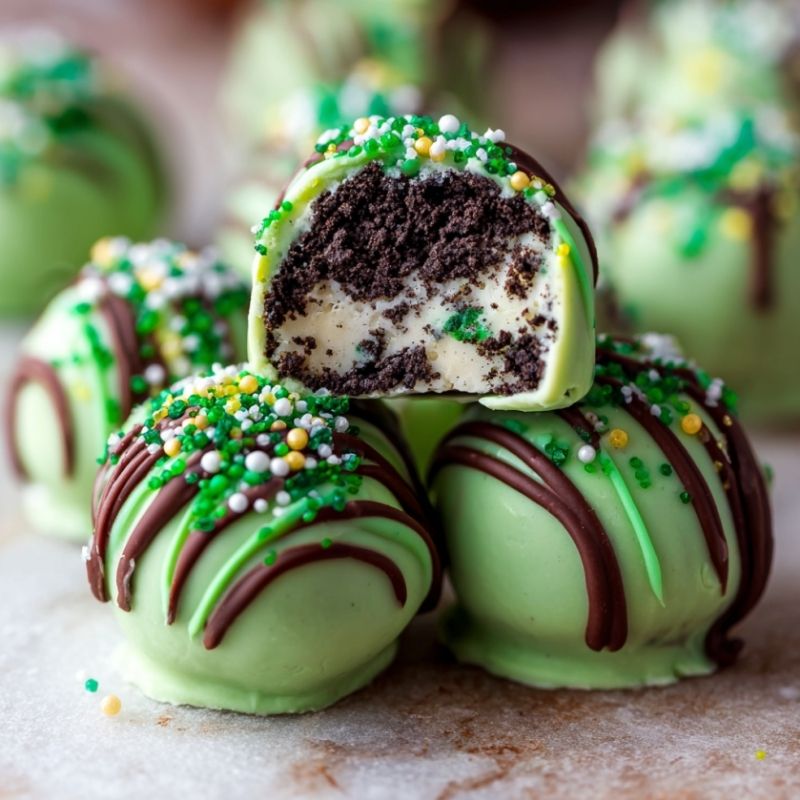
Decadent Green Velvet Brownie Truffles
A long winter evening stretches quietly in my apartment, the kind where the city sounds soften and everything feels a little slower. I’m still wearing my coat when my neighbor knocks, asking if I have something sweet for a small community potluck happening downstairs in an hour. No pressure, just a table, a few folding chairs, and people who like dessert more than conversation.
I glance at what’s already on my counter. Cocoa powder. Butter. A half used bottle of green gel food coloring left over from a styling shoot. Brownies feel too obvious, and cupcakes take patience I don’t have tonight. Truffles sound right. Small, playful, and just polished enough to look intentional.
I bake the brownies quickly, watching the surface puff and crack just slightly at the edges. The green hue peeks through the chocolate like a secret. Rolling the warm crumbs into smooth little spheres feels oddly calming, hands dusted with cocoa and sugar.
By the time the chocolate coating sets, they look finished without trying too hard. Downstairs, people reach for seconds before asking what’s in them. That’s always a good sign.
Short Description
Rich, fudgy green velvet brownie truffles coated in silky chocolate. Bite sized, festive, and perfect for parties, gifting, or quiet late night snacking.
Key Ingredients
- 1 cup all purpose flour (120g)
- ⅓ cup unsweetened Dutch process cocoa powder (30g)
- 1 cup granulated sugar (200g)
- ½ cup unsalted butter, melted (115g)
- 2 large eggs, room temperature
- ¼ cup buttermilk (60ml)
- 1 teaspoon white vinegar
- 1 teaspoon pure vanilla extract
- 1 to 2 teaspoons green gel food coloring
- ¼ teaspoon salt
- 1 ½ cups semi sweet chocolate chips (225g)
- 1 tablespoon coconut oil
- Optional ⅓ cup mini chocolate chips (60g)
- Optional ½ cup chopped walnuts or pecans (60g)
- Green sprinkles, sanding sugar, or edible glitter for decoration
Tools Needed
- 9×9 inch baking pan
- Parchment paper
- Mixing bowls
- Whisk
- Rubber spatula
- Wire rack
- Baking sheet
- Microwave safe bowl
- Fork or dipping tool
Cooking Instructions
Step 1: Prepare the Pan and Oven
Preheat the oven to 350°F (175°C). Line a 9×9 inch baking pan with parchment paper, leaving extra hanging over the sides for easy removal later.
Step 2: Mix the Dry Ingredients
In a large bowl, whisk together the flour, cocoa powder, sugar, and salt until evenly combined and free of lumps.
Step 3: Mix the Wet Ingredients
In a separate bowl, whisk the melted butter, eggs, buttermilk, white vinegar, vanilla extract, and green gel food coloring. Start with 1 teaspoon of food coloring and add more if you want a deeper green.
Step 4: Combine the Batter
Pour the wet mixture into the dry ingredients. Stir gently with a spatula just until combined. The batter will be thick and sticky. Fold in optional mini chocolate chips or chopped nuts if using. Avoid overmixing to keep the brownies fudgy.
Step 5: Bake the Brownies
Spread the batter evenly in the prepared pan and smooth the top. Bake for 22 to 25 minutes. A toothpick inserted in the center should come out with a few moist crumbs but no wet batter. Let the brownies cool completely in the pan on a wire rack for about 30 minutes.
Step 6: Form the Truffle Base
Lift the cooled brownies out using the parchment. Break them into pieces and mash with your hands until a dense dough forms. If the mixture feels dry, add 1 to 2 teaspoons of milk. If too sticky, chill for 10 minutes.
Step 7: Shape and Chill
Scoop about 1 tablespoon of dough and roll into 1 inch balls. Place on a parchment lined baking sheet and refrigerate for at least 30 minutes to firm up.
Step 8: Melt the Chocolate Coating
In a microwave safe bowl, combine chocolate chips and coconut oil. Microwave in 30 second intervals, stirring between each, until smooth and glossy.
Step 9: Dip and Decorate
Dip each chilled truffle into the melted chocolate using a fork. Let excess drip off before placing back on the baking sheet. While the coating is still wet, decorate with green sprinkles or edible glitter if desired.
Step 10: Final Chill
Refrigerate the dipped truffles for 20 to 30 minutes, until the chocolate coating is fully set.
Why You’ll Love This Recipe
Rich Chocolate Flavor: Deep cocoa brownies paired with a smooth chocolate shell deliver intense flavor in every bite.
Festive and Fun: The subtle green center adds a playful twist without overpowering the chocolate.
Bite Sized Convenience: Easy to serve, easy to eat, and perfect for sharing.
Make Ahead Friendly: These truffles hold up beautifully in the fridge for days.
Customizable: Add nuts, extra chips, or different coatings to suit your taste.
Mistakes to Avoid & Solutions
Overbaking the brownies: This leads to dry truffles. Pull the brownies when moist crumbs still cling to the toothpick.
Skipping the chill time: Warm truffles will fall apart when dipped. Chill fully before coating.
Chocolate too thick: If the coating feels heavy, stir in an extra teaspoon of coconut oil to thin it.
Truffles cracking: This happens when the brownie mixture is too dry. Add milk a teaspoon at a time until smooth.
Serving and Pairing Suggestions
Serve on a platter lined with parchment for a clean, modern look.
Place each truffle in a mini cupcake liner for parties or gifting.
Pair with coffee, espresso, or a lightly sweetened matcha latte.
Ideal for dessert tables, holiday trays, or casual gatherings.
Storage and Reheating Tips
Store truffles in an airtight container in the refrigerator for up to 5 days.
For a softer bite, let them sit at room temperature for 10 minutes before serving.
Freezing is possible for up to 1 month. Thaw overnight in the fridge before eating.
FAQs
1. Can I skip the food coloring?
Yes. You’ll have classic brownie truffles without the green velvet look.
2. Can I use boxed brownie mix?
You can, but homemade brownies give better texture and flavor for truffles.
3. Why add vinegar?
It enhances the cocoa flavor and keeps the crumb tender without tasting acidic.
4. Can I use milk chocolate instead?
Yes, though the truffles will be sweeter and less intense.
5. Do these need to stay refrigerated?
They hold best chilled, especially in warm environments.
Tips & Tricks
Lightly oil your hands when rolling to prevent sticking.
Use gel food coloring for vibrant color without thinning the batter.
Chill the dipped truffles again if decorating takes time to prevent smudging.
Recipe Variations
Mint Chocolate Truffles: Add ½ teaspoon peppermint extract to the brownie batter and sprinkle crushed candy canes on top.
Nutella Filled Truffles: Press a small indentation in each brownie ball and fill with ½ teaspoon Nutella before rolling smooth.
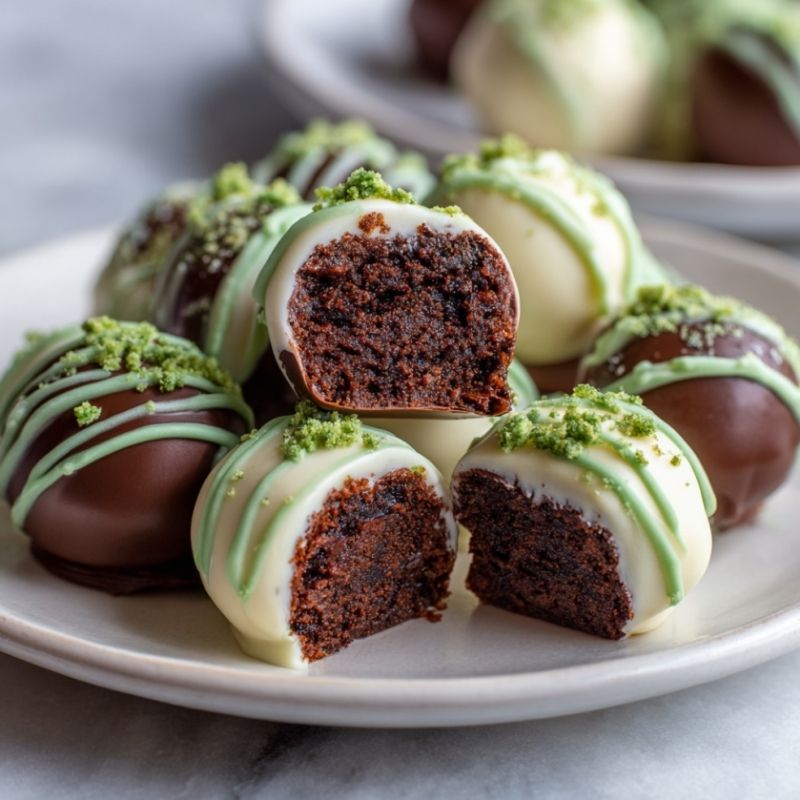
White Chocolate Coated: Replace semi sweet chocolate with white chocolate and add green drizzle for contrast.
Final Thoughts
By the time the potluck winds down, the tray comes back empty, just a few crumbs left behind. That’s the quiet reward of small desserts done well. These truffles don’t ask for much attention, yet they hold it anyway. The green center feels playful without trying to steal the spotlight. Making them is hands on and a little messy, which somehow makes the process more enjoyable.
There’s room to adjust, improvise, and taste along the way. That flexibility is what keeps baking relaxed instead of rigid. Sharing them feels natural, not forced. Sometimes dessert just needs to show up and do its job. This one does exactly that.
Decadent Green Velvet Brownie Truffles
Course: DessertDifficulty: Easy20
servings25
minutes25
minutes1
hourRich, fudgy green velvet brownie truffles coated in silky chocolate. Bite sized, festive, and perfect for parties, gifting, or quiet late night snacking.
Ingredients
1 cup all purpose flour (120g)
⅓ cup unsweetened Dutch process cocoa powder (30g)
1 cup granulated sugar (200g)
½ cup unsalted butter, melted (115g)
2 large eggs, room temperature
¼ cup buttermilk (60ml)
1 teaspoon white vinegar
1 teaspoon pure vanilla extract
1 to 2 teaspoons green gel food coloring
¼ teaspoon salt
1 ½ cups semi sweet chocolate chips (225g)
1 tablespoon coconut oil
Optional ⅓ cup mini chocolate chips (60g)
Optional ½ cup chopped walnuts or pecans (60g)
Green sprinkles, sanding sugar, or edible glitter for decoration
Directions
- Preheat the oven to 350°F (175°C). Line a 9×9 inch baking pan with parchment paper, leaving enough overhang for easy lifting later.
- In a large bowl, whisk together the flour, cocoa powder, sugar, and salt until evenly combined and lump free.
- In another bowl, whisk the melted butter, eggs, buttermilk, white vinegar, vanilla extract, and green gel food coloring. Start with 1 teaspoon of coloring and add more if a deeper green is desired.
- Pour the wet mixture into the dry ingredients and stir gently just until combined. The batter should be thick and sticky. Fold in mini chocolate chips or chopped nuts if using, stopping as soon as everything is mixed to keep the brownies fudgy.
- Spread the batter evenly in the prepared pan and smooth the top. Bake for 22 to 25 minutes, until a toothpick inserted in the center comes out with a few moist crumbs. Let the brownies cool completely in the pan on a wire rack, about 30 minutes.
- Lift the cooled brownies out using the parchment paper. Break into pieces and mash with your hands until a dense dough forms. If the mixture feels dry, add 1 to 2 teaspoons of milk. If it feels too sticky, chill for about 10 minutes.
- Scoop about 1 tablespoon of dough and roll into 1 inch balls. Place on a parchment lined baking sheet and refrigerate for at least 30 minutes until firm.
- Combine the chocolate chips and coconut oil in a microwave safe bowl. Microwave in 30 second intervals, stirring between each, until smooth and glossy.
- Dip each chilled truffle into the melted chocolate using a fork, letting excess drip off. Return to the baking sheet and decorate immediately with green sprinkles or edible glitter if desired.
- Refrigerate for 20 to 30 minutes, until the chocolate coating is fully set.