Heavenly No Bake Oreo Cream Pie
That was exactly the mood I had when I made Heavenly No Bake Oreo Cream Pie. The crust was already waiting in its little tin, and all I needed to do was whip together a few simple ingredients. The cream cheese softened perfectly on the counter while I brewed my coffee, and I could already imagine the velvety filling tucked into that chocolate cookie shell.
As I folded in the freshly whipped cream, the texture transformed into a pillowy cloud. The chopped Oreos added those speckles of crunch, peeking through like little gems, promising both creaminess and bite.
Once the filling touched the crust, I smoothed it over like frosting a cake, each swipe of the spatula more satisfying than the last. But in those hours, the flavors deepened the tang of cream cheese mellowed into the sweet crunch of Oreos, and the crust firmed up into the perfect base.
Short Description
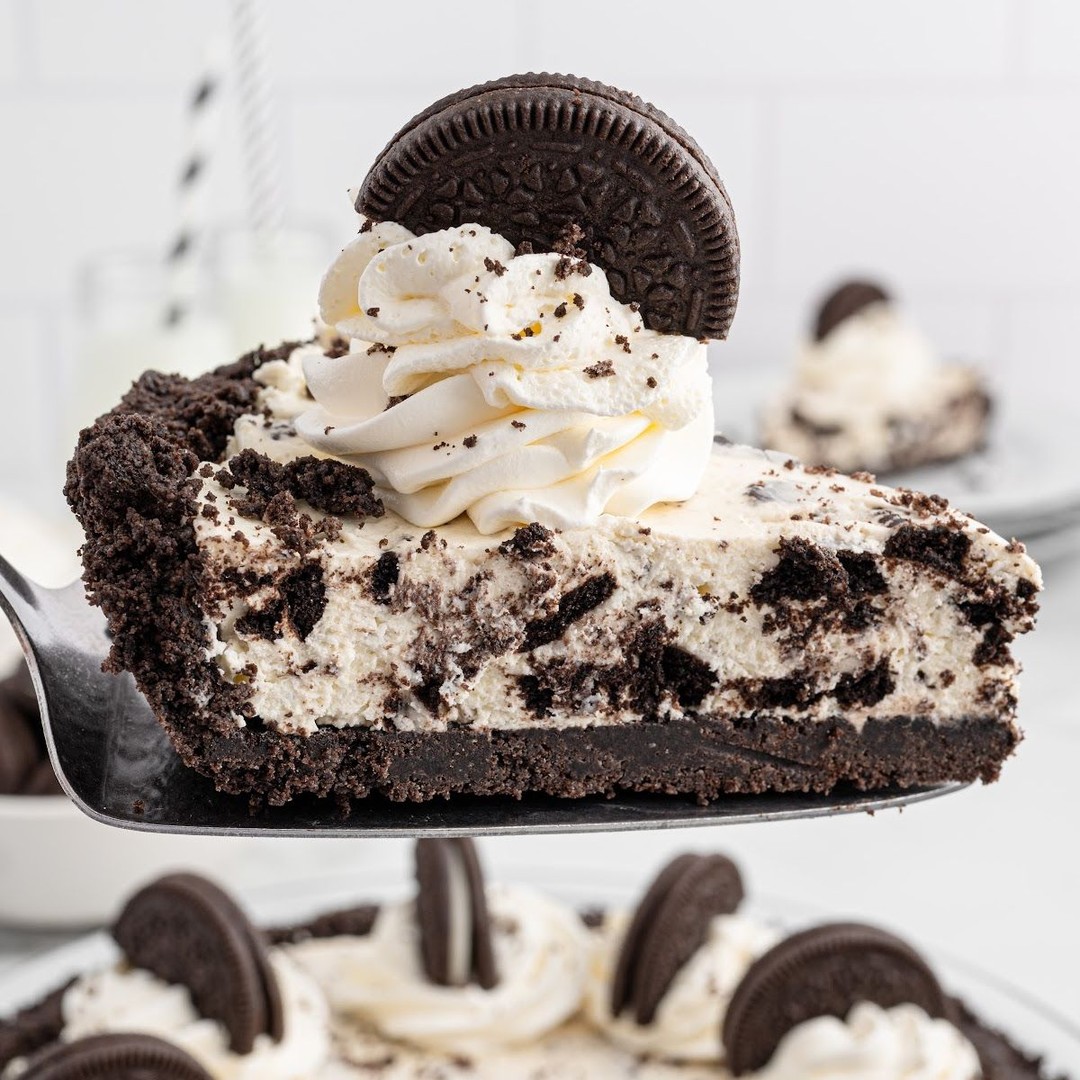
This no bake Oreo cream pie is irresistibly creamy, light, and filled with chunks of Oreo cookies, all nestled in a chocolate cookie crust. Perfect for gatherings, weeknight desserts, or when you need a treat without turning on the oven.
Key Ingredients
- 1 ready to use Oreo cookie crust
- 1 cup heavy whipping cream
- 1 bar (8 oz) cream cheese, softened
- ⅓ cup granulated sugar
- ½ teaspoon vanilla extract
- 1 ½ cups chopped Oreo cookies (plus extra for garnish)
- Additional whipped cream and chopped Oreos for garnish (optional)
Tools Needed
- Mixing bowls (one medium, one large)
- Hand mixer or stand mixer
- Rubber spatula
- Knife and cutting board
- Refrigerator space for chilling
Cooking Instructions
Step 1: Prepare the Cream Cheese Base
In a medium mixing bowl, beat the softened cream cheese until smooth and fluffy.
Step 2: Whip the Cream
In a separate large bowl, beat the heavy whipping cream until stiff peaks form. This usually takes 3–5 minutes.
Step 3: Fold and Combine
Once combined, fold in the chopped Oreo cookies until evenly mixed throughout.
Step 4: Assemble the Pie
Spoon the mixture into the Oreo crust. Use the spatula to smooth the top evenly.
Step 5: Chill and Garnish
Refrigerate for at least 6 hours, or overnight for the best texture. Before serving, garnish with swirls of whipped cream and extra chopped Oreos for presentation.
Troubleshooting Tip:
If your filling feels too soft after chilling, place the pie in the freezer for 20 minutes before slicing.
Why You’ll Love This Recipe
No oven required perfect for warm days
Creamy, airy texture with crunchy Oreo bits
Easy ingredients and beginner friendly steps
Make ahead dessert for parties or busy schedules
Customizable with toppings and flavor twists
Mistakes to Avoid & Solutions
Mistake 1: Over whipping the cream
Solution: Stop as soon as stiff peaks form. Over whipped cream turns grainy.
Mistake 2: Mixing whipped cream too aggressively
Solution: Fold gently with a spatula to keep the mixture airy and light.
Mistake 3: Not chilling long enough
Solution: Chill at least 6 hours. Overnight gives the best set and flavor.
Mistake 4: Adding warm melted butter or warm Oreos
Solution: Always add room temperature or chilled ingredients so the filling sets properly.
Mistake 5: Using low fat cream cheese
Solution: Stick to full fat cream cheese for the best texture and flavor.
Serving and Pairing Suggestions
Slice and serve chilled on its own for a crowd pleasing dessert
Add fresh strawberries or raspberries on top for a fruity contrast
Pair with iced coffee or cappuccino for a café style treat
Serve plated with chocolate drizzle for a fancier presentation
Perfect for buffets, potlucks, or family style gatherings
Store covered in the refrigerator for up to 4 days.
Freeze slices individually for up to 1 month (wrap in plastic wrap, then foil).
Thaw frozen slices in the fridge overnight before serving.
Do not microwave to reheat this dessert should always be served chilled.
Storage and Reheating Tips
FAQs
1. Can I make this pie ahead of time?
Yes, it actually tastes better the next day after chilling overnight.
2. Can I use Cool Whip instead of whipping cream?
Yes, about 2 ½ cups of Cool Whip can replace whipped cream for a shortcut version.
3. What can I use if I don’t have an Oreo crust?
Make your own by mixing 2 cups crushed Oreos with 5 tablespoons melted butter and pressing into a pie dish.
4. Can I add chocolate ganache on top?
Definitely pour a thin layer of cooled ganache on top before chilling for a richer version.
5. How do I keep the crust from getting soggy?
Brush the inside of the crust with a thin layer of melted chocolate and let it set before adding the filling.
Tips & Tricks
Chill your mixing bowl and beaters before whipping cream for faster stiff peaks.
Crush Oreos by hand for larger chunks or in a food processor for finer crumbs.
Add a pinch of instant espresso powder to enhance the chocolate flavor.
Use mini Oreos for garnish to give a playful touch.
Recipe Variations
Mint Oreo Cream Pie
Swap regular Oreos for mint Oreos and add ¼ teaspoon peppermint extract to the filling.
Peanut Butter Oreo Pie
Fold ½ cup creamy peanut butter into the cream cheese base before adding whipped cream.
Berry Oreo Pie
Add ½ cup chopped strawberries or raspberries into the filling for a fruity twist.
Chocolate Lover’s Oreo Pie
Mix 2 tablespoons cocoa powder into the cream cheese mixture and drizzle with chocolate syrup before serving.
Birthday Oreo Pie
Use golden Oreos and fold in rainbow sprinkles for a festive party version.
Final Thoughts
This no bake Oreo cream pie is one of those desserts that blends comfort with elegance. Every bite has that irresistible mix of creamy filling and crunchy cookie chunks, wrapped in the deep flavor of a chocolate crust. It’s versatile enough for a casual family night and sophisticated enough for a dinner party.
The simplicity makes it a dessert you’ll want to prepare often, and the taste makes it one that everyone will remember. It’s a slice of happiness in every forkful smooth, crunchy, sweet, and unforgettable.
Heavenly No Bake Oreo Cream Pie
Course: DessertDifficulty: Easy10
servings15
minutes30
minutes6
hoursThis no bake Oreo cream pie is irresistibly creamy, light, and filled with chunks of Oreo cookies, all nestled in a chocolate cookie crust. Perfect for gatherings, weeknight desserts, or when you need a treat without turning on the oven.
Ingredients
1 ready to use Oreo cookie crust
1 cup heavy whipping cream
1 bar (8 oz) cream cheese, softened
⅓ cup granulated sugar
½ teaspoon vanilla extract
1 ½ cups chopped Oreo cookies (plus extra for garnish)
Additional whipped cream and chopped Oreos for garnish (optional)
Directions
- Beat softened cream cheese until smooth, then mix in sugar and vanilla.
- Whip heavy cream until stiff peaks form.
- Fold whipped cream into cream cheese mixture, then fold in chopped Oreos.
- Spread filling evenly into Oreo cookie crust.
- Refrigerate at least 6 hours or overnight.
- Garnish with whipped cream and Oreos before serving.
Notes
- If your filling feels too soft after chilling, place the pie in the freezer for 20 minutes before slicing.